Easily fix CORS issues with Kong API Gateway
Last Modified: 2021-12-30 04:49PM
Description
A CORS Request is a layer 7 request that comes from one origin and requests resources from another. An origin can be defined as a different domain, an alternative subdomain on the same domain, or using other criteria like port and protocol. The range of which CORS requests are unnacceptable is defined using CORS related HTTP Headers.
Learn more about CORS here.
Introduction
This guide will lead through the process of deploying and configuring a Kong API Gateway docker container to proxy traffic between a client and an API it is accessing (which is hosted on a different domain).
The Kong CORS plugin will be used to correctly setup the required CORS headers. This allows a single configuration location for all cors configuration in your microservice architecture, which aides in maintainability.
Why use Kong to proxy CORS requests
- The CORS configuration for all services in an applications stack becomes centralised.
- Configuration becomes decoupled from the application itself, application-level redeployment or instrumentation is not longer to amend CORS configuration.
- Logging and monitoring for CORS related problems become centralised. Troubleshooting of CORS related problems can happen from the same location.
- Simplicity of configuration.
- The Kong CORS plugin abstracts away the base HTTP headers to expose only what is relevant to restricting CORS requests for an application.
The original and goal architectures are shown below:
Starting architecture
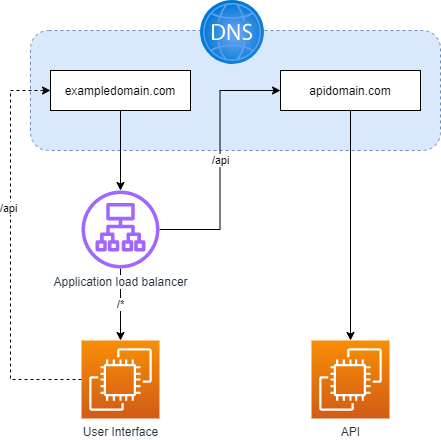
To download this draw.io diagram click here
- A user interface is routed to using an application load balancer.
- The user interface requests a resources from the endpoint on a separate domain:
apidomain.com.
- The application load balancer routes to the user interface on all paths.
Goal architecture
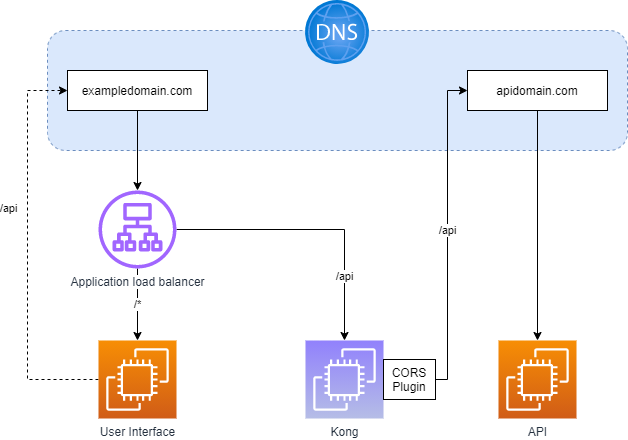
To download draw.io diagram click here
- Instead of interacting directly with the API, the user interface sends a request to Kong (which sits on the
exampledomain.com domain).
- Kong directs the request to the API, and populates the required headers to allow the cross origin resource request request.
- The application load balancer routes to the user interface on all paths other than
/api.
- The application load balancer routes to the Kong when the path is
/api.
- Kong strips the
/api path and proxies requests to the API hosted on apidomain.com.
Process
We will now go through the following steps to deploy Kong to allow these CORS requests.
We will deploy Kong into a single-node kubernetes cluster for ease. Other options are available, see the Kong documentation for how to deploy as a binary, or as a singleton docker container.
We will also deploy Konga as a user interface to Kong. This will make it easier for us to configure Kong. Configuration using the Kong API is available as an alternative.
Steps
- Deploy EC2 instance for Kong and install prerequisites.
- Deploy Kong.
- Deploy Konga.
- Configure Konga.
- Configure Kong.
- Amend the application and the load balancer.
Step 1: Deploy the EC2 and install prerequisites
Step 1a: Deploy ec2 instance
Deploy an EC2 instance using your method of choice.
Make sure to allow port 80 ingress access as Kong will use this for incoming traffic. The egress rules should also allow port 80/443 traffic.
Step 1b: Install prerequisites
Install Docker
- As we are using an EC2 instance running amazon linux 2, we will use the centos installation instructions. See here for instructions using other operating systems or distributons.
sudo yum install -y yum-utils
sudo yum-config-manager \
    --add-repo \
    https://download.docker.com/linux/centos/docker-ce.repo
sudo yum install docker-ce docker-ce-cli containerd.io
sudo systemctl start docker
Install Kind
curl -Lo ./kind https://kind.sigs.k8s.io/dl/v0.12.0/kind-linux-amd64
chmod +x ./kind
mv ./kind /usr/bin/kind
Install Helm
- We will be using helm version 3
curl -fsSL -o get_helm.sh https://raw.githubusercontent.com/helm/helm/main/scripts/get-helm-3
chmod 700 get_helm.sh
./get_helm.sh
Confirm the dependencies are functioning as expected
- Start a Kind cluster and confirm the nodes become ready.
- Expose port 80, 8080 and 443 to allow access to Kong and Konga.
~/cluster.yaml:
kind: Cluster
apiVersion: kind.x-k8s.io/v1alpha4
networking:
nodes:
- role: control-plane
  extraPortMappings:
  # Ingress-nginx proxy
  - containerPort: 80
    hostPort: 80
    listenAddress: "0.0.0.0"
  - containerPort: 8080
    hostPort: 8080
    listenAddress: "0.0.0.0"
  - containerPort: 433
    hostPort: 443
    listenAddress: "0.0.0.0"
kind create cluster --name kind --config ~/cluster.yaml
kubectl get nodes
Step 2: Deploy Kong
To deploy Kong we will use the offical helm chart for Kong.
- Add the chart repository
helm repo add kong https://charts.konghq.com
helm repo update
- Pull the helm chart to the machine.
- Extract the chart, we are using v2.7.0.
- Copy the contents to a new charts folder.
mkdir -p ~/charts
mv kong ~/charts
rm kong-*.tgz
- Create a values file for Kong.
- This values file sets overrides to the general use helm chart.
- We will be deploying a postgresql instance as part of the Kong deployment to allow configuration through Konga.
- We will also expose the admin API endpoint to allow for this.
~/charts/kong/values-override.yaml:
image:
  repository: kong
  tag: "2.7"

env:
  prefix: /kong_prefix/
  database: postgres

proxy:
  enabled: true
  type: ClusterIP
  http:
    hostPort: 80
  tls:
    hostPort: 443

admin:
  enabled: true
  type: ClusterIP
  http:
    enabled: true
    servicePort: 8001
    containerPort: 8001

postgresql:
  enabled: true
  postgresqlUsername: kong
  postgresqlDatabase: kong
  service:
    port: 5432

ingressController:
  enabled: false
  installCRDs: false
- Deploy Kong using helm.
helm upgrade --install kong ~/charts/kong --values ~/charts/kong/values-override.yaml --debug
- The database will come up first, then the init migration pod will run, then kong will run.
Step 3: Deploy Konga
To deploy Konga we will use the helm chart from the pantsel/konga github repository.
- Pull the repository
git clone git@github.com:pantsel/konga.git
- Extract the tar archive
mv konga/charts/konga/ ~/charts/
rm ./konga -rf
- We will use the default values for Konga.
- Amend the Konga deployment template to expose a hostPort on port 8080.
To do this:
- create a new line between lines 32 and 33 in
~/charts/konga/templates/deployment.yaml which reads hostPort: 8080.
- The indentation should be in line with the surrounding lines.
The resultant ports block should look like this:
          ports:
            - name: http
              containerPort: 1337
              hostPort: 8080
              protocol: TCP
- Exposing this port will allow external access to Konga.
- Deploy Konga
helm upgrade --install Konga ~/charts/konga --debug
Configure Konga to communicate with kong through it’s admin API endpoint.
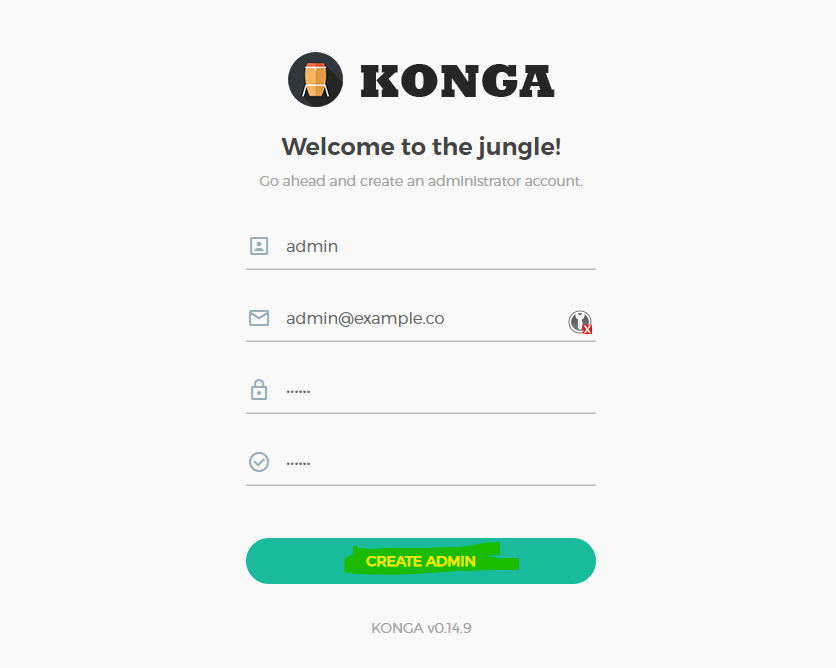
- Register a new user.
- When Konga is deployed for the first time without any preconfiguration performed, it will ask you to register a new admin user.
- Fill in the form and click the “Create Admin” button.
-
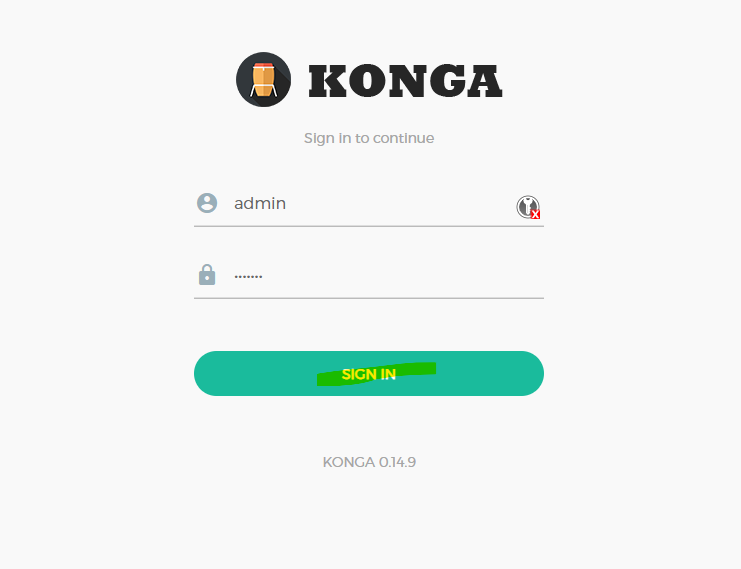
Sign in to konga with the new user.
-
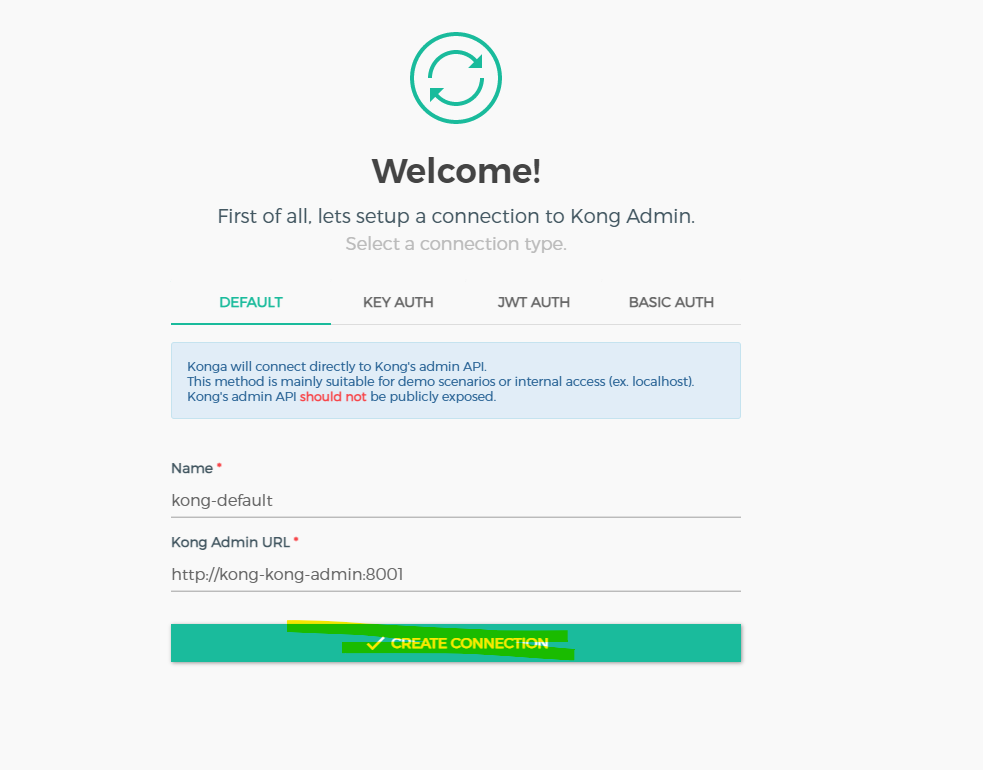
Connect konga to the kong admin api endpoint.
- After signing in for the first time, you will be prompted to setup a connection to Kong Admin.
- Fill the values in as follows:
- Name:
kong-default
- Kong Admin URL:
http://kong-kong-admin:8001
- Ensure the port is 8001, not 8444 as we have not enabled TLS for the Kong admin endpoint!
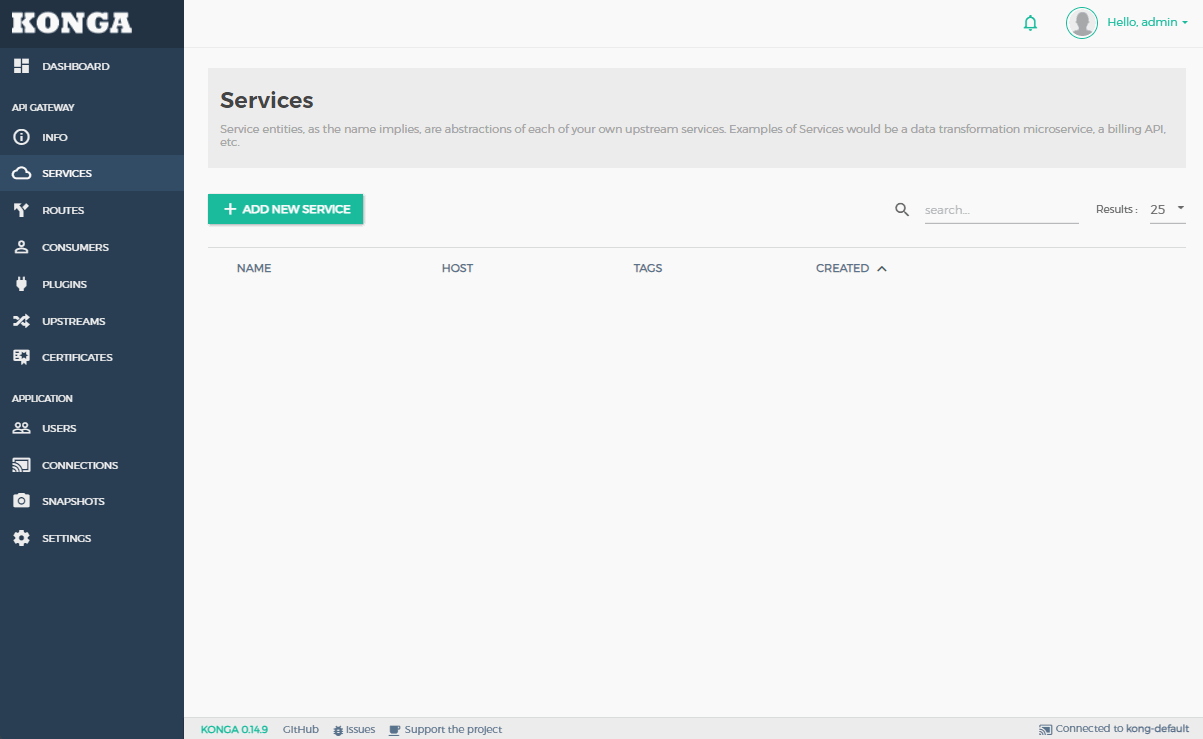
We will now add the service, routing and plugin configuration to Kong.
- Create a new “Service” object for the API.
- Click “SERVICES” on the left hand-menu in Konga.
- Click the “+ ADD NEW SERVICE” button.
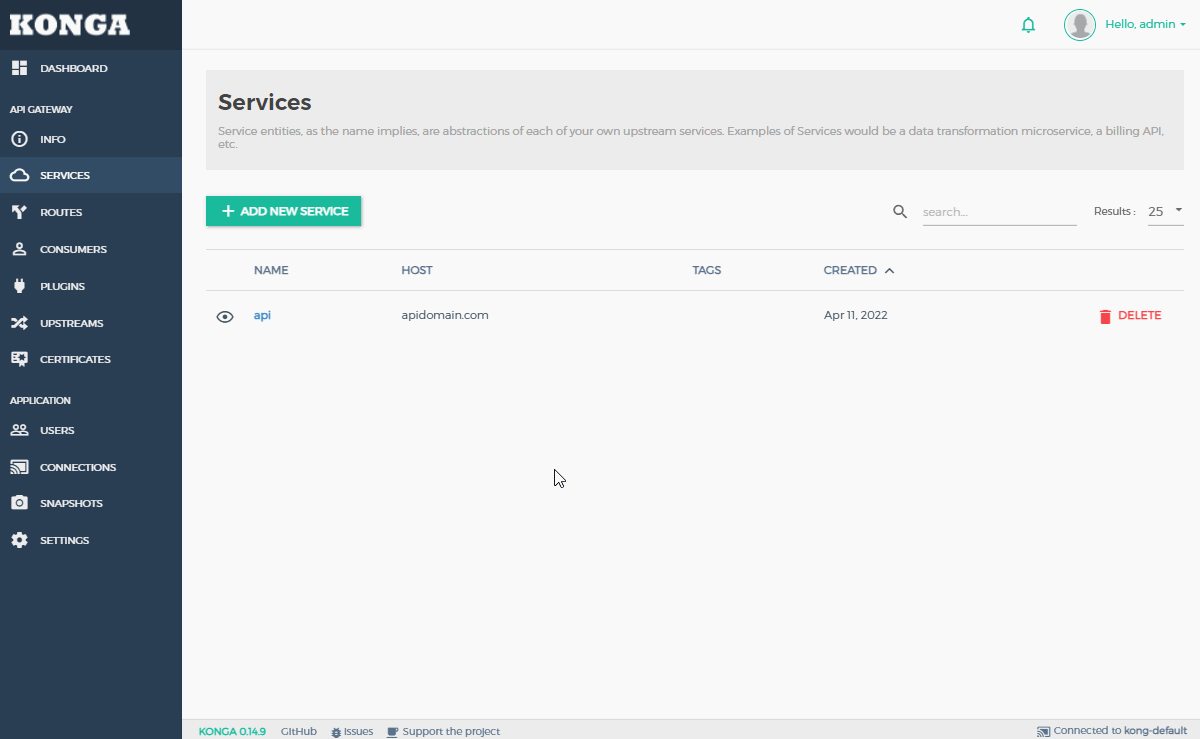
- Populate the values with your service details:
- Name:
api
- Protocol:
http
- Host:
apidomain.com
- Port:
80
- Create a new “Route” object for the new “Service”
- This will define the routing behaviour for this service for Kong.
- Click on “SERVICES” in the left-hand menu in Konga.
- Click on the new service created’s name.
- Click on “Routes”, under the service menu.
- Click on the “+ ADD ROUTE” button.
- Populate the values with your route details:
- Name:
all
- Paths:
/api
- Strip Path:
NO
- This will mean the path is preserved in the request to the API.
- If this is not required, set to
YES.
- Add and configure the
CORS Plugin for the service.
- This will add the appropriate CORS headers to incoming and outgoing requests.
- We will add the CORS plugin for only our new service within Kong.
- Plugins can be added to specific routes or globally if desired.
- Once the plugin is added, it can be enabled/disabled using the toggle switch next to it in Konga.
To add and configure the Cors plugin, perform the following steps:
- Click on “SERVICES” on the left hand menu.
- Click on the name of the new service.
- Click on “Plugins” under the new service menu.
- Click on the “+ ADD PLUGIN” button.
- Under the security tab, in the “Cors” box, select “ADD PLUGIN”.
- Populate the values in the form:
- origins:
http://exampledomain.com
- This list defines the accepted incoming origins from the API’s perspective.
- These must be FQDNs with protocol, or
*.
- Using
* leaves your API completely exposed.
- headers:
Accept Accept-Version Content-Length Content-MD5 Content-Type Date
- This sets the value of the
Access-Control-Allow-Headers. By default it will assume the value of the Access-Control-Request-Headers on the incoming request.
- This list is available in the CORS plugin documentation in the Kong documentation pages.
- Headers not listed here but used by your application must be added manually.
- credentials:
No
- enable this if using the
Access-Control-Allow-Credentials header.
- max_age:
3600
- preflight_continue:
true
- Allow preflight OPTIONS requests to be proxied to the backend service.
- Ensuring the plugin is enabled will now allow cors requests.
Step 6: Amend the application and load balancer
- Amend the load balancer to point to Kong when the incoming requests’s path is
/api.
- And finally, amend the application to point to the new API URL for api requests (
http://exampledomain.com/api).
Considerations
This guide shows an example of how to configure the Kong api gateway to mediate traffic between microservices and calling applications. To be used in production the process must be tailored to the specific use case.
The processes decribed herein can be followed to add more services, or add more routes to the same service. Consult the Kong documentation for more information on how to do this.
For security, TLS should be enabled on Kong’s admin api if it is exposed. An alternative to this is to disable the admin proxy using the values file after reaching a stable configuration.
Other security considerations should also be taken when moving this into produciton. Such as:
- Using a strong passphrase with Konga, and cycling the passphrase periodically.
- Only deploying Konga and Kong’s admin API when using them.
- Using some form of whitelisting or private addressing to expose Kong’s admin API. This can be by ip whitelisting for port 8001 access, or by using a VPN connection to Kong’s private address space.
Other considerations related to the reliability of the deployment should also be taken. For example, deploying into a high-availability setup - as opposed to our single-node kind cluster.
References